Garage door torsion springs are an essential component of the garage door mechanism. They play a crucial role in balancing the weight of the door, making it easier to open and close. Over time, these springs can wear out and require replacement. In this guide, I will walk you through the process of safely and efficiently replacing your garage door torsion springs.
Understanding the importance of replacing garage door torsion springs
Replacing garage door torsion springs is not just a matter of convenience; it is also a matter of safety. When these springs become worn or damaged, they can lose their ability to support the weight of the door properly. This can lead to the door becoming unbalanced, which can pose a significant risk to anyone operating the door. By replacing the torsion springs when needed, you can ensure that your garage door operates smoothly and safely.
Signs that indicate it’s time to replace your garage door torsion springs
There are a few telltale signs that indicate it’s time to replace your garage door torsion springs. One of the most noticeable signs is when your garage door starts to open or close unevenly. If one side of the door is higher than the other, it is a clear indication of a problem with the torsion springs. Additionally, you may notice excessive noise when operating the door or find that the door is becoming increasingly difficult to open or close. These signs should not be ignored, as they indicate that the torsion springs are no longer functioning properly and need to be replaced.
Safety precautions before replacing garage door torsion springs
Before you begin the process of replacing your garage door torsion springs, it is crucial to take the necessary safety precautions. First and foremost, ensure that you have disconnected the power to the garage door opener. This will prevent any accidental activations while you are working on the springs. Additionally, always wear safety glasses and gloves to protect yourself from any potential injuries. It is also advisable to have a sturdy ladder or step stool to safely access the springs. By following these safety precautions, you can minimize the risk of accidents and injuries.
Step-by-step guide on how to replace garage door torsion springs
Now that you understand the importance of replacing garage door torsion springs and have taken the necessary safety precautions, let’s dive into the step-by-step process of replacing them:
Step 1: Gather the necessary tools and materials
Before you begin, make sure you have all the tools and materials you will need for the job. This includes new torsion springs, winding bars, vice grips, a socket wrench, and a ladder or step stool.
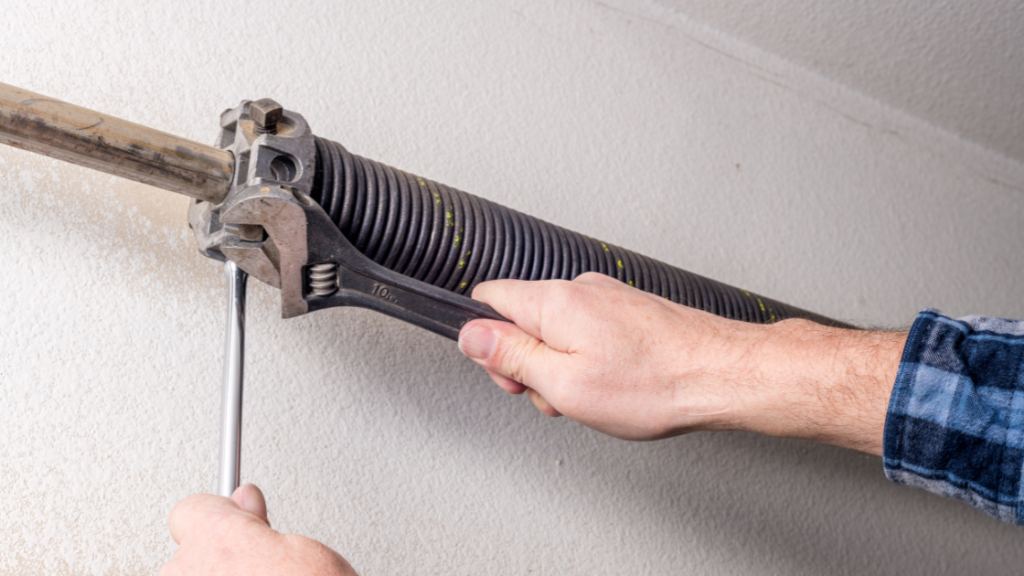
Step 2: Release tension from the old springs
Using winding bars, carefully release the tension from the old springs. Start by inserting one winding bar into the winding cone and securing it with vice grips. Then, insert another winding bar into the second winding cone and use it to unwind the tension from the springs. Repeat this process for both sides of the door.
Step 3: Remove the old springs
Once the tension has been released, you can remove the old springs from the torsion tube. Loosen the set screws on the stationary cone and slide the springs off the tube. Be cautious as the springs may still have some residual tension.
Step 4: Install the new springs
Place the new springs onto the torsion tube and tighten the set screws on the stationary cones to secure them in place. Ensure that the springs are properly aligned and centered on the tube.
Step 5: Wind the new springs
Using the winding bars, carefully wind the new springs to the appropriate tension. Start with the side that does not have the winding cone and work your way to the other side. Be cautious and follow the manufacturer’s instructions for the recommended number of turns.
Step 6: Test the door
Once the new springs are properly wound, test the door to ensure that it opens and closes smoothly. If you notice any issues, double-check the tension and alignment of the springs.
Tools and materials needed for replacing garage door torsion springs
To replace garage door torsion springs, you will need the following tools and materials:
- New torsion springs
- Winding bars
- Vice grips
- Socket wrench
- Ladder or step stool
Having these tools and materials readily available will make the replacement process much smoother and more efficient.
Common mistakes to avoid when replacing garage door torsion springs
While replacing garage door torsion springs may seem like a straightforward task, there are a few common mistakes that you should avoid:
1. Attempting the task without proper knowledge: It is essential to have a good understanding of the process before attempting to replace the torsion springs. Improper handling can result in injuries or further damage to the door mechanism.
2. Failing to release tension properly: Releasing tension from the old springs is a critical step. Failing to do so can lead to accidents and injuries. Always use the appropriate winding bars and follow the manufacturer’s instructions.
3. Incorrectly installing the new springs: The new springs must be installed correctly to ensure smooth and safe operation of the garage door. Improper installation can cause the door to become unbalanced or malfunction.
By avoiding these common mistakes and following the step-by-step guide outlined earlier, you can ensure a successful and safe replacement of your garage door torsion springs.
How much does it cost to replace garage door torsion springs?
The cost of replacing garage door torsion springs can vary depending on several factors, including the type of springs, the size of the door, and the labor charges. On average, you can expect to pay anywhere between $200 to $400 for the replacement of torsion springs. It is advisable to contact a reputable garage door service provider to get an accurate estimate based on your specific requirements.
Hiring a professional vs. DIY: Pros and cons
Deciding whether to hire a professional or attempt the replacement yourself is a crucial consideration. Here are some pros and cons to help you make an informed decision:
Hiring a professional:
- Pros:
- Expertise and experience in handling garage door torsion springs
- Ensures proper installation and alignment for optimal performance
- Saves time and effort
- Cons:
- Higher cost due to labor charges
- Scheduling availability may vary
DIY (Do-It-Yourself):
- Pros:
- Cost-effective option, especially for those with experience
- Flexibility to work at your own pace
- Satisfaction of completing the task yourself
- Cons:
- Risk of accidents and injuries if not properly executed
- Lack of expertise may lead to mistakes or further damage
- Time-consuming process for beginners
Consider your level of experience, available time, and comfort with handling garage door mechanisms before deciding whether to hire a professional or attempt the replacement yourself.
Conclusion:
Regular maintenance and inspection of garage door torsion springs are crucial for ensuring the smooth and safe operation of your garage door. By promptly replacing worn or damaged springs, you can prevent accidents, extend the lifespan of your door, and minimize repair costs. Whether you choose to hire a professional or tackle the replacement yourself, following safety precautions and understanding the process will help you achieve the desired results.
FAQs
1. How often should garage door torsion springs be replaced?
The lifespan of garage door torsion springs can vary depending on usage and maintenance. Generally, they are expected to last for about 10,000 cycles, which translates to approximately seven to nine years for a typical residential garage door. However, factors such as extreme weather conditions or frequent use may require more frequent replacement.
2. Can I replace only one garage door torsion spring?
It is highly recommended to replace both torsion springs simultaneously, even if only one appears to be damaged. This ensures balanced operation and prevents additional strain on the new spring or other components of the garage door mechanism.
3. Are torsion springs dangerous to work with?
Yes, torsion springs can be dangerous to work with due to the high tension they hold. It is crucial to follow safety precautions, use the appropriate tools, and have a good understanding of the process. If you are unsure or uncomfortable, it is best to hire a professional to handle the replacement.
4. Can I use the old torsion springs for a new garage door?
It is generally not recommended to reuse old torsion springs for a new garage door. Over time, springs can lose their tension and become worn, which can affect the performance and safety of the door. It is best to install new springs when replacing a garage door.
5. How do I know if my garage door torsion springs are the correct size?
The size of garage door torsion springs is determined by factors such as the weight and height of the door. It is crucial to consult with a garage door professional to ensure you select the correct size springs for your specific door.
Remember, safety should always be a top priority when working with garage door torsion springs. If you are unsure or uncomfortable with the process, it is best to seek professional assistance.


